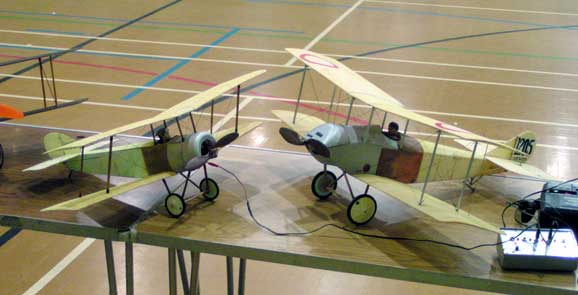
Who said this? "Readers of my reviews will know that I don't like the finishing stages of model building very much" A clue. This is the builder who cut out 245 individual pieces of Solarfilm for his Lockheed Lightning! I may exaggerate slightly, but clearly he doesn't like painting much! Another clue: his models fly better than mine. But wait: I don't even want to try to duplicate the superb finishes of indoor scale aircraft you see in the magazines. They are just heart-stoppingly good and so achingly beyond ordinary abilities and patience that I prefer to set myself easier targets which at least stand a chance of being met. These notes are for people like me: builders of Depron or other foam models with an urge to fly rather than decorate.
 All I have is a simple
airbrush with a can of compressed air, a very few top quality
sable brushes, Tamiya acrylic paints, a lining pen from Lesro
Models and a stubby finger or two. For my favourite aircraft
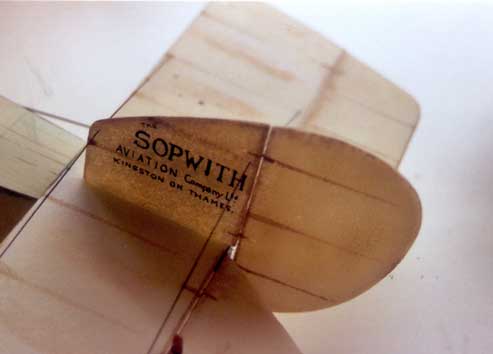
(a Sopwith, any Sopwith) which has natural linen flying surfaces,
I mix a little flat yellow with flat white (perhaps one part in
20) until I get the "pale primrose" colour of varnished
linen. I thin the paint slightly (about 25%) and spray fairly
evenly on all the surfaces. It doesn't seem to matter if there
are slight irregularities or white patches, even if you are using
stronger colours such as PC10 (see note). The rest of the process
takes the eye away from the colour and onto the detail. Next,
using Flat Desert Yellow thinned by 50%, I carefully paint the
wing rib tapes using a small brush; one of the sort that comes
to a point when you lick the end. You can get these from artists
suppliers but not from model shops! I also use a steel rule supported
at both ends over the wing as a sort of bridge to steady my hand
and keep the brush away from the surface being painted. At this
point the wing looks pretty good, but nothing special. Now is
the time to bring it alive by fooling the eye into seeing a fabric
surface rather than painted foam.
All I have is a simple
airbrush with a can of compressed air, a very few top quality
sable brushes, Tamiya acrylic paints, a lining pen from Lesro
Models and a stubby finger or two. For my favourite aircraft
(a Sopwith, any Sopwith) which has natural linen flying surfaces,
I mix a little flat yellow with flat white (perhaps one part in
20) until I get the "pale primrose" colour of varnished
linen. I thin the paint slightly (about 25%) and spray fairly
evenly on all the surfaces. It doesn't seem to matter if there
are slight irregularities or white patches, even if you are using
stronger colours such as PC10 (see note). The rest of the process
takes the eye away from the colour and onto the detail. Next,
using Flat Desert Yellow thinned by 50%, I carefully paint the
wing rib tapes using a small brush; one of the sort that comes
to a point when you lick the end. You can get these from artists
suppliers but not from model shops! I also use a steel rule supported
at both ends over the wing as a sort of bridge to steady my hand
and keep the brush away from the surface being painted. At this
point the wing looks pretty good, but nothing special. Now is
the time to bring it alive by fooling the eye into seeing a fabric
surface rather than painted foam.
 Thin a small amount
of Desert Yellow by 90%, perhaps more, and use this and other
similar washes to simulate changes in light falling on the wing
section, weathering effects and so on. Try this: load a small
brush with wash and paint it behind the spar position, between
2 ribs. Then smooth out the wet area with your finger in the
direction of the airflow. Instantly, the flat foam looks hollow,
as if it were fabric sagging slightly between the ribs and the
spar underneath. Do this for every rib station and behind each
spar and the leading edge: the wing starts to look as if you had
built it from tissue and balsa, then left it outside to weather
naturally for a season.
Thin a small amount
of Desert Yellow by 90%, perhaps more, and use this and other
similar washes to simulate changes in light falling on the wing
section, weathering effects and so on. Try this: load a small
brush with wash and paint it behind the spar position, between
2 ribs. Then smooth out the wet area with your finger in the
direction of the airflow. Instantly, the flat foam looks hollow,
as if it were fabric sagging slightly between the ribs and the
spar underneath. Do this for every rib station and behind each
spar and the leading edge: the wing starts to look as if you had
built it from tissue and balsa, then left it outside to weather
naturally for a season.
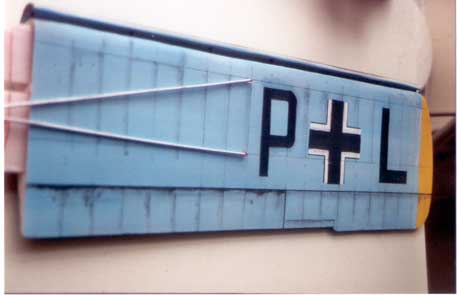
The fuselage is just as easy. Paint in the longeron and former locations as you did for the wing rib tapes, then use the wash to accentuate the "downwind" side of all the vertical lines. Use a brown wash under the fuselage and by the exhausts, and a grey wash by control wire exits, always using the finger painting method to smooth out the effect. You hardly ever need to use black paint on a model unless it was black on the prototype. Shadows are merely a darker shade of the base colour.
Don't overdo it: start with pale washes first and build up effects: you could even practise on a spare bit of foam. Always check your colour values in daylight. When you are checking your work, come on the model "by surprise" and see what immediate impression it makes on you. If it all goes horribly wrong, spray over it and start again, or just fly it anyway and get the next one right!
Note. PC10 was used from late 1916 onwards and is the most argued-over colour. I have used everything from Litespan dark green to Tamiya brown. My book helpfully describes it as "khaki-green, which varied in hue considerably ranging from a dark green to a light kahki and was seen in may intermediate shades" Tamiya Khaki Drab looks good when airbrushed but may be too green - who knows?