Sloping Off - September 2005
Starting from Scratch
by Mike Roach
We all know the term “scratch building”: it’s usually said with a certain amount of awe “Éoh yes, that’s Henry’s SE5 scratch built you know”, implying that Henry has put a LOT more effort into his model than some mere kit-basher. An unsaid rider to this conversation is that not only has Henry not shaken the kit box in lieu of cutting out his own ribs, but he has also drawn up his own plan! After months of research, which included a trip to the National Aerospace Museum in Texas, Henry has found that all other SE5 plans are at fault and has completely redrawn, using the full-size aircraft only, a set of 1/3rd plans, complete to the last stitch and rib tape.
Hushed silence.
In fact, drawing up a plan from a source is one of the most interesting parts of model making and is not particularly difficult. It’s also very rewarding indeed to see the results flying around your club’s field: then you can casually say over a coffee afterwards “oh yes, it’s all my own work you know, plans, parts, dummy engine, I even re-wound that old CD player motor you gave meÉ” Actually, the last part is a lie I can’t rewind a cassette without getting it in a tangle, let alone a CD motor, but the rest is true enough. Let me show you how.
Inspiration
I wanted to make another “sticks and string” indoor model for GWS hardware, much like the Howard-Wright monoplane I made a couple of years ago. It flew so well inside and out of doors and looked so good in the air that a replacement (it was bounced by an IFO and never recovered) was needed. I looked at the Bleriot XI (everybody makes one of those), the Blackburn Monoplane (doesn’t look quite right to me), a high wing version of the Bleriot (the XII, I think) and a few other candidates but kept putting off the decision. After all, I you’re going to spend a month on a project, it’s got to be something you really want to make!
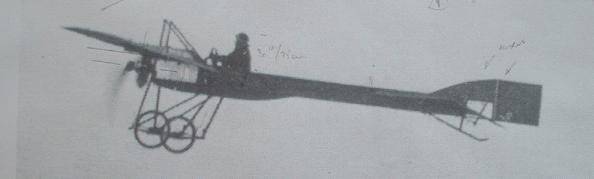
Then I wandered into Christchurch’s Oxfam shop and scanned the bookshelf. There was a copy of “The RAF in Camera 1903-1939”, by Roy Conyers Nesbitt. It was a snip at £1.99 (originally £19.99!) and in perfect condition. I casually looked through the first few pages and there it was: page 13, James Valentine in a Deperdussin monoplane, taking third place in the 1911 Circuit of Britain. There were 2 pictures of the plane, one three quarters front on the ground and one nearly side on in the air. Actually, Valentine seems just to have taken off from a field near Bristol and has pushed forward about 20 degrees of down elevator on the control column. Perhaps he had control problems? This was the aircraft sleek and streamlined for its day, lots of wing area, exposed control wires, pilot and engine all waiting to be brought to life.
Filling in the Details
Having found your subject, the next step is to go on the Net or scour your public library and look for a plan of the aircraft. In this case it soon became clear that Valentine’s was not a “stock” model and although there were plans of similar aircraft from M Deperdussin, none of them was exactly the plane in the photographs. The “B” monoplane was the closest and there is one in the French National Air Museum in Paris, but the Chairman would not hear of an expenses-paid trip. It appears that Valentine’s plane was either an early version of the “B” or indeed the “A”. Even better all modellers want to build something individual, preferably a good-looking plane that is not too well known. That’s really why I turned down the Bleriot XI: it’s beautiful with a fantastic pedigree, but like the Mustang or the Spitfire is simply too popular. And the scale detail is too well documented to get away with sloppy work!
Whilst on the Net, get some dimensions of the engine. What’s the diameter of a 50 hp Gnome Monosoupape? Well, it turns out to be 98 cm, with a depth of 101 cm.
 Using Photographs
Collect all the photographs and plans and use a scanner or the local print shop to enlarge the images to A4 size. It’s much easier to see hidden details on an enlarged copy. Subtle changes in the light on various components can suddenly make sense when compared with other pictures. Take the Air Museum “B”. The control column consists of a “steering” wheel connected to aileron wire guide tubes, which also move backwards and forwards to actuate the elevator. The same sort of system can just be made out on Valentine’s aircraft, but only if you know what to look for.
Don't Start to Draw Just Yet
Don’t jump in straight away with the drafting film or AutoCAD. You’ll get a far better idea of how the various parts of the plane fit together if you make a small 3-view sketch on a scrap of paper. The principal dimensions such as span, length, height and so on can be guessed at. I never trust the length and height measurements it all depends where they held the tape and what the attitude of the plane was, but the span at least should be correct. A Deperdussin “B” had a span of 8.5 metres: an excellent place to start. Having laid out the basic shape, it’s time to decide what size you want your model. Now I have a “thing” about scale factors and I like my models to be an exact scale. In this case, 1/10th scale gives a span of 85 cm (34.8” for a span of 29’8” in old units).
A number of other dimensions can be inferred from the various photographs and drawings. The diameter of the Gnome engine can be used to size the wheels and undercarriage in the three quarters front ground view. The pilot’s upper body (probably 75 80 cm) can be used to scale most of the fuselage and tail dimensions in the side view, especially when compared with the wheel diameter. If the estimated size of the rudder tallies when using two different ways of working out the answer, then don’t push your luck!
The wing chord seems to be a generous 18 cm (7.15”), giving a wing area of 1.65 sq ft and a wing loading of 3 to 4 oz/sq ft depending on the final weight of the model: important information for the project to proceed with confidence. The Howard-Wright had slightly less wing area and flew very slowly indeed, so the Deperdussin should have similar characteristics.
Well, There You Are, Then
I started building the GWS version and ran out of steam: something or other got in the way (decorating, I think) and when I got back to the building board, I immediately started on a “easy-build” 24” version for Falcon RC, made almost entirely from 1/32 balsa. This was a response to someone who said my 1 ounce Sopwith was too hard to make! The first flight was the other evening and it flew perfectly, right off the board (until it flew out of range and dived in, but little damage was done). Look out for the plan in AMI soon.
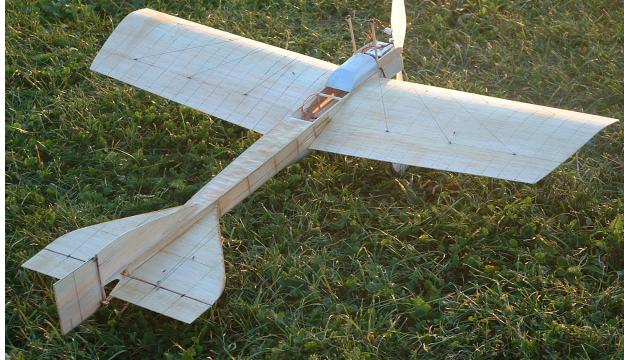
One ounce 24" span nearly all sheet indoor flyer. Look at that camber!