SLOPING OFF...
...Christchurch and District Model Flying Club’s Magazine for August 2023
LIPO CARE AND USE, BY TREVOR HEWSON
For those of us who were flying electric before the advent of LiPo batteries, the batteries of choice were based on the subC sized NiCd cell. Admittedly this did give way to similar sized NiMh cells for the last year or two before LiPos came along but, I for one, never really liked them.
The NiCd technology progressed rapidly during the time I was using it, a sub-C cell having a capacity of 1200mah when I started out, getting up to 1800mah or more by the time the technology began to run out of steam. They couldn’t rival our modern day LiPos for energy density of course ( see separate panel) but on the other hand you could fly them until they were utterly exhausted without them suffering any damage. This indeed was standard practice, assuming of course that the receiver and servos had their own separate power supply. If powered by a BEC from the main flight battery, it was important to make sure that the power cut off was set to the right number of cells to ensure that a controlled dead stick landing could be made before the battery was totally exhausted.
Not only could these cells be discharged fully in flight, the recommendation for storage was that they should be stored fully discharged too. The cells were very robust, both physically and chemically and would survive this sort of treatment for many years, even though the discharge rates were usually very high, flight times often being less than 3 minutes from fully charged to dead flat.
So you can see that, when LiPos came along, we had to change our habits somewhat. Of course, some folk made the adjustment more readily than others which accounts for LiPos getting a pretty bad press in the first few years as it was found that they really didn’t stand up well to this kind of treatment.
So, how should we treat our LiPo batteries? I offer the following ideas, as always with the caveat that they are just my views, not based on any specialist knowledge or in-depth research:
i) Selection: Choose the right battery for the flight you are about to undertake. It can be helpful to write inside the battery bay what size and weight battery should be fitted. I must admit I don’t follow this advice and have been caught out a couple of times, fortunately with no dire consequences. In fact I my Panther autogyro actually flew better with the heavier 4s LiPo that I accidentally fitted instead of the 3s x 3300mah that it was designed for, so I now routinely tape a bit of lead to the 3s batteries before fitting them into the model! If your model has a high power demand, such as an EDF or a fast climbing glider fitted with the minimum size battery, then choose a battery with a low internal resistance - see ‘Health Monitoring’ below.
ii) Discharge: Flying until the power cut off (PCO) circuit in the ESC cuts off the motor to protect the supply to the radio is not recommended! Equally if you fly until you notice a drop off in performance this is likely to result in a battery discharged to a level that will shorten its lifetime. The simplest way to avoid this is with a flight timer. Most transmitters nowadays enable you to set up a timer to run when the throttle is active (above, say, 10%). Whilst this is still only a very rough guide to battery usage, once you’ve developed a regular flying style for a particular model, whether it’s an aerobat, EDF, scale warbird or glider, you’ll be surprised how accurate it can be. However, bear in mind that in windy weather you will generally use more power, so should aim to land a bit earlier than usual. On the other hand when there are other models in the sky you may find that your finely honed, fluent, continuous aerobatic routine is interrupted and you spend a bit more time cruising around avoiding the traffic and your battery will have a bit more left in it than usual at the end of the flight. After the flight, put the battery on the checker and note the reading. From this you may decide to adjust your timer - or you may get an early indication that the capacity of your ageing battery is declining.
On telemetry-equipped radios it is often possible to have live monitoring of battery voltage and/or capacity used during flight. These have the potential to be more accurate than the throttle timer method but they also have their own pitfalls and need careful setting up or they can be more misleading than helpful. I do use these methods in specific circumstances but mostly I find the simple throttle timer to be sufficient. Your choice.
iii) Damage: Physically damaged batteries are potentially very dangerous so avoid tugging on the wires - and don’t crash! Severely puffed batteries should also be treated as damaged. Damaged batteries should be disposed of, regardless of how well they are performing.
iv) Cycling: NiCds used to benefit from occasional cycling (discharging down to dead flat and then slowly recharging to full). I believe the main reason we did this was because NiCds had no balance connectors so the charge state of the individual cells could get out of step after a while. Fortunately NiCds could tolerate a continuous low rate charge long after they were full so, by doing this long slow charge, it was possible to get the cells back in step again. This is another area where we have had to change our habits. We all know (at least if you’ve read the previous article in this series!) about the importance of balance charging and we also know that the cells don’t tolerate deep discharge very well so, when it comes to cycling, my recommendation is simple - don’t do it. The only exception to this would be for an elderly battery where you suspect it may be losing capacity. In this case do a balance charge, then set your charger to discharge mode, with a termination voltage of 3 to 3.5v per cell and a modest discharge rate (no more than 1c) and see what it delivers. If it’s not up to your needs, then dispose of it (see next article in the series) - There’s no point in repeating the cycling in the hope that it will get better.
v) Health Monitoring: By far the best way of keeping track on how your batteries are ageing is to measure their ‘Equivalent Internal Resistance’ (EIR or, simply, IR) from time to time. For this to be helpful though, you do need to:
- Make all measurements on the same device
- Make all measurements at a very similar temperature
- Record the results for comparison with future measurements
- Have some idea of what constitutes a ‘good’ result
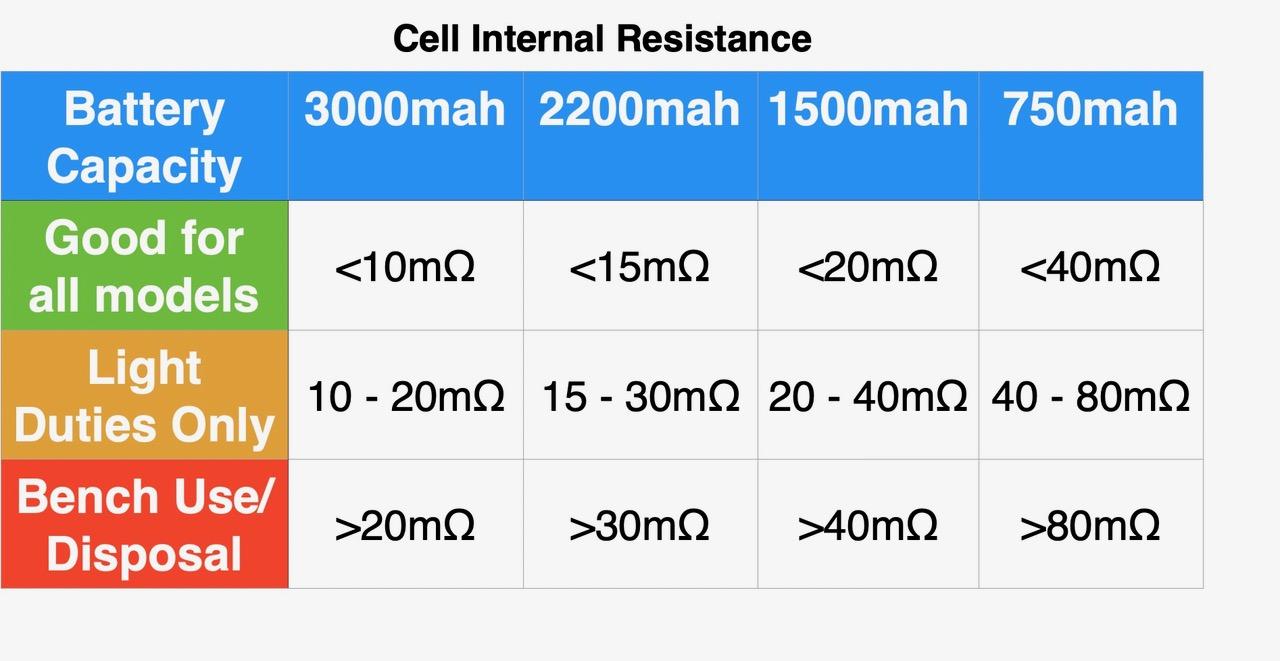
- Based on results with my batteries, on my charger, at the temperature of my workshop, I drew up this simple traffic lights table.

As you can see, the expected EIR readings vary according to the capacity of the cell, higher capacity cells having lower resistance to enable them to deliver higher currents. By all means use this table as a starting point but feel free to modify it, once you’ve got an idea of how the readings from your charger align with your usage patterns. I record my readings with small stickers on the battery (colour coded to mach the traffic lights), but if you’re more spreadsheet minded then that way works too. But bear in mind that if you’ve got several similar batteries in your flight box and you want to pick out the best one to fly your power-hungry EDF, you’ll need access to your spreadsheet at the field or online - I just look at the coloured stickers. Saves reaching for the reading glasses too!
Well that’s about it for this instalment. In the last article we’ll look at Storage and Disposal.
Why Bother With LiPos?
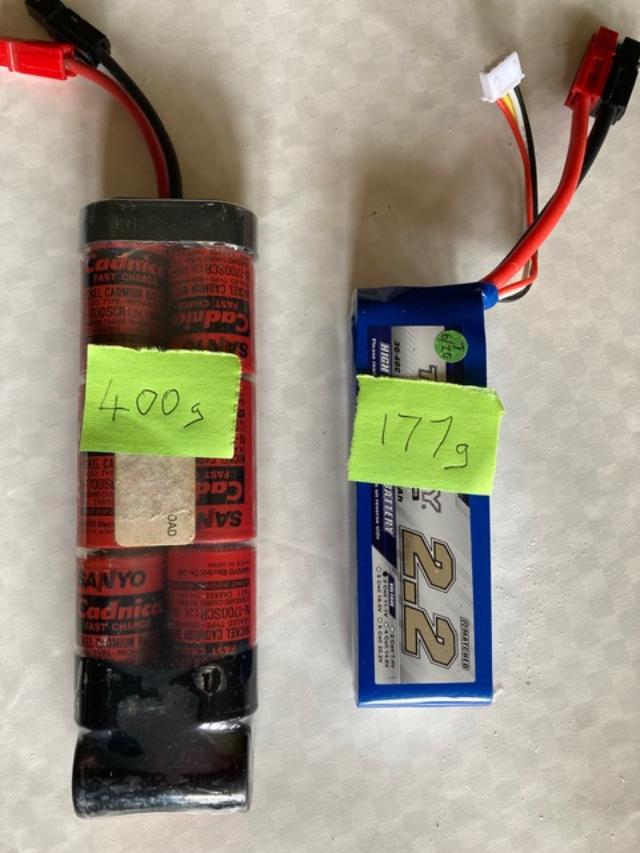
Having read how foolproof and rugged NiCds were, you might be wondering why we were all so eager to make the switch to LiPo technology. The picture says it all really. It shows my favourite 7-cell 8.4v, 1700mah NiCd alongside the ever-popular 3 cell, 11.1v, 2200mah LiPo.

At more than twice the weight, the venerable NiCd holds just 58% of the energy of its featherweight successor. Case closed.
